Large, finger-sized buttons in Android
Friday, January 16th, 2009 - 4:39 pm - Android
July 18, 2009: Updated for Android 1.5
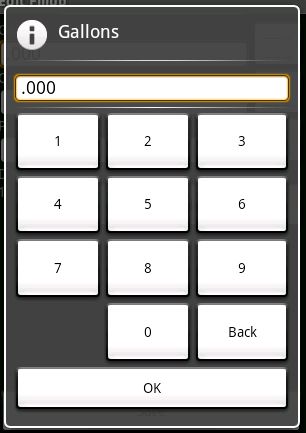
Recently, I created a simple dial pad style number dialog. I wanted to make the numbers as large as possible to make finger input simple. Getting the buttons to stretch evenly and not look strange turned out to be a challenge, but I eventually arrived at a solution. For the full source, scroll down.

Big buttons in Android
- The dialog uses a relative layout. It’s usually best at placing objects on the screen no matter what the resolution or orientation.
- The numbers are contained in a table layout, which is good at spacing things evenly.
- To get the numbers to stretch to the bottom of the screen, layout_above is set to the OK button, which is aligned to the bottom of the dialog. The width is fill_parent so that the buttons fill the width of the screen.
- To get each row to be the same height in HTML, you would set the height to a percent. In Android, use layout_weight. Setting the weight of each row to the same value will make them the same size.
- Also use layout_weight on each button to even out their widths.
- In version 1.5, Android started to be “smart” about how it lays out items. Since the content of the “Back” button is longer than any other button, Android will make that column in the table wider. It will do so even though the layout weights of all of the items are the same. To override that behavior, set the width of every item to 0. That way, when Android stretches the buttons out to fit in the table, every button will start from the same width, 0.
<?xml version="1.0" encoding="utf-8"?>
<!--
Layout for a number input dialog
Author: Connor Garvey
Created: Jan 11, 2009
Version 0.0.4
Since 0.0.4
-->
<RelativeLayout xmlns:android="http://schemas.android.com/apk/res/android"
    android:layout_width="fill_parent"
    android:layout_height="fill_parent"
    android:padding="7dip">
  <EditText android:id="@+id/number"
      android:background="@android:drawable/editbox_background"
      android:cursorVisible="false"
      android:layout_width="fill_parent"
      android:layout_height="wrap_content"  />
  <View android:id="@+id/numberSeparator0"
      android:layout_width="fill_parent"
      android:layout_height="4dp"
      android:layout_below="@id/number" />
  <View android:id="@+id/numberSeparator1"
      android:background="@drawable/black_white_gradient"
      android:layout_width="fill_parent"
      android:layout_height="1dp"
      android:layout_below="@id/numberSeparator0" />
  <View android:id="@+id/numberSeparator2"
      android:layout_width="fill_parent"
      android:layout_height="4dp"
      android:layout_below="@id/numberSeparator1" />
  <Button android:id="@+id/ok"
      android:layout_width="fill_parent"
      android:layout_height="wrap_content"
      android:text="@string/message_ok"
      android:layout_alignParentBottom="true" />
	<TableLayout android:id="@+id/row1"
	    android:layout_width="fill_parent"
	    android:layout_height="wrap_content"
        android:layout_below="@id/numberSeparator2"
        android:layout_above="@id/ok"
        android:layout_weight="1">
    <TableRow
        android:layout_weight="1">
      <Button android:id="@+id/n1"
          android:layout_width="0dip"
          android:layout_height="fill_parent"
          android:text="1"
          android:layout_weight="1" />
      <Button android:id="@+id/n2"
          android:layout_width="0dip"
          android:layout_height="fill_parent"
          android:text="2"
          android:layout_weight="1" />
      <Button android:id="@+id/n3"
          android:layout_width="0dip"
          android:layout_height="fill_parent"
          android:text="3"
          android:layout_weight="1" />
    </TableRow>
    <TableRow
        android:layout_weight="1">
      <Button android:id="@+id/n4"
          android:layout_width="0dip"
          android:layout_height="fill_parent"
          android:text="4"
          android:layout_weight="1" />
      <Button android:id="@+id/n5"
          android:layout_width="0dip"
          android:layout_height="fill_parent"
          android:text="5"
          android:layout_weight="1" />
      <Button android:id="@+id/n6"
          android:layout_width="0dip"
          android:layout_height="fill_parent"
          android:text="6"
          android:layout_weight="1" />
    </TableRow>
    <TableRow
        android:layout_weight="1">
      <Button android:id="@+id/n7"
          android:layout_width="0dip"
          android:layout_height="fill_parent"
          android:text="7"
          android:layout_weight="1" />
      <Button android:id="@+id/n8"
          android:layout_width="0dip"
          android:layout_height="fill_parent"
          android:text="8"
          android:layout_weight="1" />
      <Button android:id="@+id/n9"
          android:layout_width="0dip"
          android:layout_height="fill_parent"
          android:text="9"
          android:layout_weight="1" />
    </TableRow>
    <TableRow
        android:layout_weight="1">
      <TextView
          android:layout_width="0dip"
          android:layout_height="fill_parent"
          android:layout_weight="1" />
      <Button android:id="@+id/n0"
          android:layout_width="0dip"
          android:layout_height="fill_parent"
          android:text="0"
          android:layout_weight="1" />
      <Button android:id="@+id/back"
          android:layout_width="0dip"
          android:layout_height="fill_parent"
          android:text="Back"
          android:layout_weight="1" />
    </TableRow>
  </TableLayout>
</RelativeLayout>
It is difficult to get references to buttons in dialogs. You first have to inflate the dialog’s view, then you can find a button by its ID.


Thanks! This has saved my life!
You could have the source code running in an archive? I want to make a keypad to enter phone numbers. thanks
how did you make those buttons?
muchas gracias amigo! (Thank you very much, this information will be very usefol to me)
[…] used the example at this site to create the big button layout. Once a button is pressed, it will send a command over Bluetooth to […]
Thanks a lot for that information… That article inspired me a lot fot creating the application “Calculator Mem” on the Android Market. Both Landscape and portrait modes use this technique
Awesome … the tip for setting the width to ‘0’ is something I’ve been losing sleep over. Thanks!
Cheers!
How is the id ‘R.layout.number_input_dialog’ generated or defined?
(I have the same problem with ALL tutorials regarding android dialogs.)
Hi Nils,
The Android compiler generates the “R” (resource) class. If you’re using the Eclipse file, R is generated automatically and updated as you update the code. “layout” is a type of resource. Resources of the layout type are named according to their file names. In this case, the project has a file called “/res/layout/number_input_dialog.xml”. The resource ID for that layout XML is, then, R.layout.number_input_dialog.
This may seem overly complicated, but it allows the Android compiler and run time to perform heavy static linking instead of forcing the runtime to root around for your stuff. It also simplifies caching of the dialogs so that they don’t have to be re-instantiated every time they’re loaded.
OMG thanks so much for the inflater code…..I assume this works for remote views as well? I have been trying to find a way of referencing buttons in Desktop Widgets for ages!
Unfortunately, I haven’t worked on widgets at all. I remember having to trawl through the not-so-complete Android API for a long time to come up with that code. The key was finding the inflater and then finding the inflater service.
LayoutInflater inflater = (LayoutInflater)context.getSystemService(Context.LAYOUT_INFLATER_SERVICE);I hope you’re able to use it!
Hi,
I tried your code and it worked perfectly until I set a clicklistener on the buttons …
I received this message
03-31 18:49:43.752: ERROR/AndroidRuntime(225): android.content.res.Resources$NotFoundException: String resource ID #0x2
03-31 18:49:43.752: ERROR/AndroidRuntime(225): at android.content.res.Resources.getText(Resources.java:145)
03-31 18:49:43.752: ERROR/AndroidRuntime(225): at android.widget.TextView.setText(TextView.java:2423)
do you have a working code?
thx
It’s difficult to diagnose your problem without looking at your code, but it seems that you’re looking up the wrong ID. Make sure you’re using the correct button ID and that you’re looking it up in the dialog class’ view.
Here’s the code that puts a click listener on the 0 button. I always save button references to local variables.
LayoutInflater inflater = (LayoutInflater)context.getSystemService(Context.
LAYOUT_INFLATER_SERVICE);
View view = inflater.inflate(R.layout.number_input_dialog, null);
this.button0 = (Button)view.findViewById(R.id.n0);
this.button0.setOnClickListener(new NumberButtonListener(this.number, “0”));