Many of Android’s screens use attractive dividers with gradients that fade from black to white to black. Here’s how to create one of your own.
1. Create a file called “black_white_gradient.xml” in /res/drawable. Paste this into it.
<?xml version="1.0" encoding="utf-8"?>
<shape xmlns:android="http://schemas.android.com/apk/res/android"
    android:shape="rectangle">
  <gradient
      android:startColor="#00000000"
      android:centerColor="#FFFFFFFF"
      android:endColor="#00000000"
      android:angle="0" />
</shape>
2. Create a view in the target layout and apply the gradient as the background. The “black_white_gradient” in “@drawable/black_white_gradient” refers to the file name of the shape above.
<View android:id="@+id/divider"
    android:background="@drawable/black_white_gradient"
    android:layout_width="fill_parent"
    android:layout_height="1dp"
    android:layout_below="@id/someOtherThing" />
July 18, 2009: Updated for Android 1.5
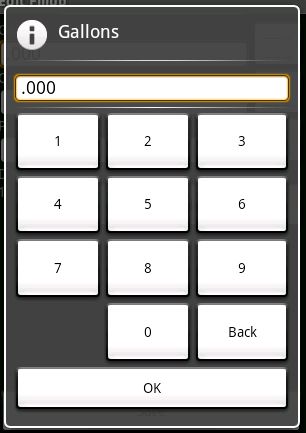
Recently, I created a simple dial pad style number dialog. I wanted to make the numbers as large as possible to make finger input simple. Getting the buttons to stretch evenly and not look strange turned out to be a challenge, but I eventually arrived at a solution. For the full source, scroll down.

Big buttons in Android
- The dialog uses a relative layout. It’s usually best at placing objects on the screen no matter what the resolution or orientation.
- The numbers are contained in a table layout, which is good at spacing things evenly.
- To get the numbers to stretch to the bottom of the screen, layout_above is set to the OK button, which is aligned to the bottom of the dialog. The width is fill_parent so that the buttons fill the width of the screen.
- To get each row to be the same height in HTML, you would set the height to a percent. In Android, use layout_weight. Setting the weight of each row to the same value will make them the same size.
- Also use layout_weight on each button to even out their widths.
- In version 1.5, Android started to be “smart” about how it lays out items. Since the content of the “Back” button is longer than any other button, Android will make that column in the table wider. It will do so even though the layout weights of all of the items are the same. To override that behavior, set the width of every item to 0. That way, when Android stretches the buttons out to fit in the table, every button will start from the same width, 0.
<?xml version="1.0" encoding="utf-8"?>
<!--
Layout for a number input dialog
Author: Connor Garvey
Created: Jan 11, 2009
Version 0.0.4
Since 0.0.4
-->
<RelativeLayout xmlns:android="http://schemas.android.com/apk/res/android"
    android:layout_width="fill_parent"
    android:layout_height="fill_parent"
    android:padding="7dip">
  <EditText android:id="@+id/number"
      android:background="@android:drawable/editbox_background"
      android:cursorVisible="false"
      android:layout_width="fill_parent"
      android:layout_height="wrap_content"  />
  <View android:id="@+id/numberSeparator0"
      android:layout_width="fill_parent"
      android:layout_height="4dp"
      android:layout_below="@id/number" />
  <View android:id="@+id/numberSeparator1"
      android:background="@drawable/black_white_gradient"
      android:layout_width="fill_parent"
      android:layout_height="1dp"
      android:layout_below="@id/numberSeparator0" />
  <View android:id="@+id/numberSeparator2"
      android:layout_width="fill_parent"
      android:layout_height="4dp"
      android:layout_below="@id/numberSeparator1" />
  <Button android:id="@+id/ok"
      android:layout_width="fill_parent"
      android:layout_height="wrap_content"
      android:text="@string/message_ok"
      android:layout_alignParentBottom="true" />
	<TableLayout android:id="@+id/row1"
	    android:layout_width="fill_parent"
	    android:layout_height="wrap_content"
        android:layout_below="@id/numberSeparator2"
        android:layout_above="@id/ok"
        android:layout_weight="1">
    <TableRow
        android:layout_weight="1">
      <Button android:id="@+id/n1"
          android:layout_width="0dip"
          android:layout_height="fill_parent"
          android:text="1"
          android:layout_weight="1" />
      <Button android:id="@+id/n2"
          android:layout_width="0dip"
          android:layout_height="fill_parent"
          android:text="2"
          android:layout_weight="1" />
      <Button android:id="@+id/n3"
          android:layout_width="0dip"
          android:layout_height="fill_parent"
          android:text="3"
          android:layout_weight="1" />
    </TableRow>
    <TableRow
        android:layout_weight="1">
      <Button android:id="@+id/n4"
          android:layout_width="0dip"
          android:layout_height="fill_parent"
          android:text="4"
          android:layout_weight="1" />
      <Button android:id="@+id/n5"
          android:layout_width="0dip"
          android:layout_height="fill_parent"
          android:text="5"
          android:layout_weight="1" />
      <Button android:id="@+id/n6"
          android:layout_width="0dip"
          android:layout_height="fill_parent"
          android:text="6"
          android:layout_weight="1" />
    </TableRow>
    <TableRow
        android:layout_weight="1">
      <Button android:id="@+id/n7"
          android:layout_width="0dip"
          android:layout_height="fill_parent"
          android:text="7"
          android:layout_weight="1" />
      <Button android:id="@+id/n8"
          android:layout_width="0dip"
          android:layout_height="fill_parent"
          android:text="8"
          android:layout_weight="1" />
      <Button android:id="@+id/n9"
          android:layout_width="0dip"
          android:layout_height="fill_parent"
          android:text="9"
          android:layout_weight="1" />
    </TableRow>
    <TableRow
        android:layout_weight="1">
      <TextView
          android:layout_width="0dip"
          android:layout_height="fill_parent"
          android:layout_weight="1" />
      <Button android:id="@+id/n0"
          android:layout_width="0dip"
          android:layout_height="fill_parent"
          android:text="0"
          android:layout_weight="1" />
      <Button android:id="@+id/back"
          android:layout_width="0dip"
          android:layout_height="fill_parent"
          android:text="Back"
          android:layout_weight="1" />
    </TableRow>
  </TableLayout>
</RelativeLayout>
It is difficult to get references to buttons in dialogs. You first have to inflate the dialog’s view, then you can find a button by its ID.
LayoutInflater inflater = (LayoutInflater)context.getSystemService(Context.LAYOUT_INFLATER_SERVICE);
View view = inflater.inflate(R.layout.number_input_dialog, null);
this.button0 = (Button)view.findViewById(R.id.n0);
this.button0.setOnClickListener(new NumberButtonListener(this.number, "0"));


